外部リンクは、たくさん貼りすぎると離脱率が高くなったりしますが、外部の記事の紹介など、使うケースは多いと思います。
当サイトでも外部リンクを作ることがもちろんありますが、そんな時「簡単にイケてる感じの外部リンク」ができるよう、外部リンク用カードのショートコードを作ってみました。
個人的に、久方ぶりのショートコード作成です
外部リンクを作るとき、ちょっとカスタマイズしたい方はぜひこの記事を参考にしてみてください。
目次
実装後のデザインサンプル
早速、実装後のデザインサンプルです。
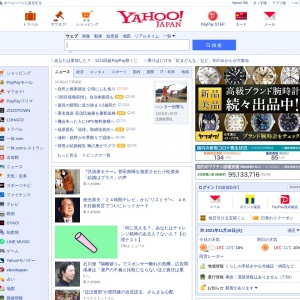
リンク先をキャプチャしたカードです。
OGPの画像を表示させるカードです。
設定が完了すると、URLをセットにしたショートコードで、アイキャッチ画像や、概要文入りのリンクカードを表示してくれます。
見た目は、当サイトでも利用しているWordPressテーマSANGOにあわせています。
上記のようにカードは2種類ありますが、functions.php へコピペするコードとショートコードだけそれぞれ違い、実装手順と使うCSSは共通です。
なので、後述の手順STEP.4で分岐するので、お好みでコピペください。
注意点
この記事のスニペットはは、基本コピペで実装できますが functions.php をいじります。
functions.phpは色々なことができるファイルですが、いじるのをミスってしまうと、WordPress全体が真っ白のエラーになってしまうこともあるので、注意が必要です。
リンクカードを表示させる手順と方法
リンクカードの設定手順について解説していきます。手順は全部で5つです。
リンク先のURLや画像などの情報を、OGPから取得してリンクカードにします。
そのOGPの取得の為、OpenGraph.phpを使います。
まずは、以下のリンク先からOpenGraph.phpをダウンロードしましょう。
ダウンロードしたOpenGraph.phpを、WordPressで使用しているテーマのfunctions.phpが置いてある階層にアップロードしましょう。
子テーマを使っている場合は、子テーマのfunctions.phpが置いてある階層に設置すればOKです。
ダウンロードしたOpenGraph.phpをそのまま使用すると、テキストの部分が文字化けするので、以下のコードをOpenGraph.phpに追記します 。
$HTML = @mb_convert_encoding($HTML,'HTML-ENTITIES', 'ASCII, JIS, UTF-8, EUC-JP, SJIS');追記するのは、84行目あたりのstatic private function _parse の関数の中にコピペすればOKです。
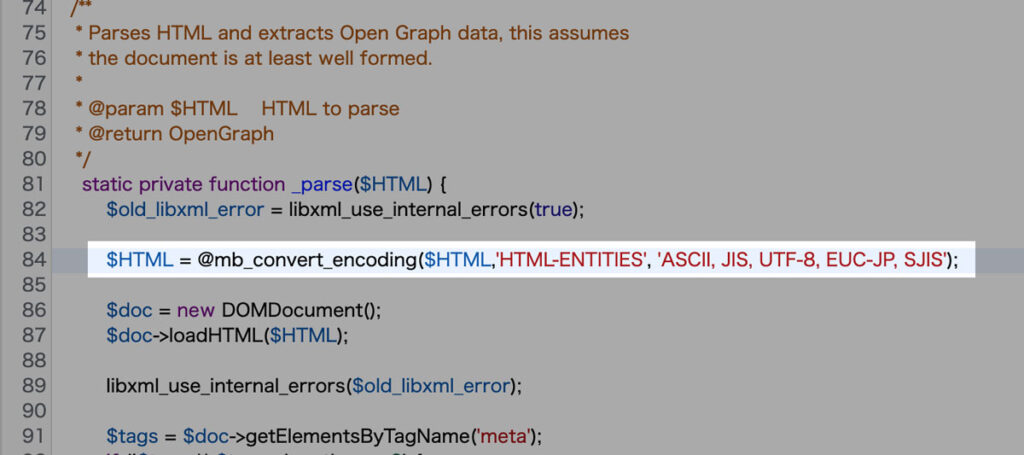
こうすることで、テキスト部分が文字化けせずに表示されるので必ず記述しておきましょう。
次に、functions.phpへ以下のコードをコピペして、ショートコードを使える設定をします。
表示される画像が異なる2つのコードがあるので、お好みの方をお使いください。
それぞれ異なる関数にしているので、両方コピペして使っても大丈夫です。
以下のように、リンク先のキャプチャ画像にする場合はこちらのコードをコピペです。
コードを表示する
/* 外部リンク対応リンクカードのショートコード */
function show_Linkcard($atts) {
  extract(shortcode_atts(array(
    'url'=>"",
    'title'=>"",
    'excerpt'=>""
  ),$atts));

  //画像サイズのwidth
  $img_width ="300";
  //画像サイズのheight
  $img_height = "300";

  //OGPを取得
  require_once 'OpenGraph.php';
  $graph = OpenGraph::fetch($url);

  //OGPタグからタイトルを取得
  $Link_title = $graph->title;
  if(!empty($title)){
    $Link_title = $title;//title=""の入力がある場合はそちらを優先
  }

  //OGPタグからdescriptionを取得
  $Link_description = wp_trim_words($graph->description, 60, '…' );//文字数は任意で変更
  if(!empty($excerpt)){
    $Link_description = $excerpt;//値を取得できない時は手動でexcerpt=""を入力
  }

  //wordpress.comのAPIを利用してスクリーンショットを取得
  $screenShot = 'https://s.wordpress.com/mshots/v1/'. urlencode(esc_url(rtrim( $url, '/' ))) .'?w='. $img_width .'&h='.$img_height.'';
  $xLink_img = '<img src="'. $screenShot .'" width="'. $img_width .'" />';

  //ファビコンGET
  $host = parse_url($url)['host'];
  $searchFavcon = 'https://www.google.com/s2/favicons?domain='.$host;
  if($searchFavcon){
    $favicon = '<img class="favicon" src="'.$searchFavcon.'">';
  }

  //HTML出力
  $linkcard .='
  <div class="blogcard ex">
  <span class="blogcard_thumbright">あわせて読みたい</span>
  <a href="'. $url .'" target="_blank" rel="noopener noreferrer">
   <div class="blogcard_thumbnail">'. $xLink_img .'</div>
   <div class="blogcard_content">
    <div class="blogcard_title"><p>'. $Link_title .'</p></div>
    <div class="blogcard_description"><p>'. $Link_description .'<p></div>
    <div class="blogcard_link"><span>URL</span>'. $url .'<i class="icon-external-link-alt"></i></div>
   </div>
   <div class="clear"></div>
  </a>
  </div>';

  return $linkcard;
}
add_shortcode("linkcard", "show_Linkcard");カード内の画像を、OGPの画像にする場合はこちらのコードをコピペです。
コードを表示する
//ショートコードに追加
add_shortcode("linkcard", "show_Linkcard");

function show_Linkcard2($atts){
	extract(shortcode_atts(array(
		'url' => "",
    'title'=>"",
    'excerpt'=>""
	), $atts));
	require_once('OpenGraph.php');
	$graph = OpenGraph::fetch($url);
	$card_title = $graph->title;
  if(!empty($title)){
    $card_title = $title;//title=""の入力がある場合はそちらを優先
  }
	$site_name = $graph->site_name;
	$description = wp_trim_words($graph->description, 60, '...');
  if(!empty($excerpt)){
    $description = $excerpt;//値を取得できない時は手動でexcerpt=""を入力
  }
	$image = $graph->image;
	if (!empty($image)) {
		$card_img = '<img src="' . $image . '" width="300" alt="' . $card_title . '">';
	} else {
		$card_img = '<img src="' . get_template_directory_uri() . '/library/images/default_small.jpg' . '" width="300" alt="' . $card_title . '">'; //画像がない時
	}
	$linkcard = <<<EOS
  <div class="blogcard ex">
  <span class="blogcard_thumbright">外部リンク</span>
  <a href="{$url}" target="_blank" rel="noopener noreferrer">
				<div class="blogcard_thumbnail">{$card_img}</div>
				<div class="blogcard_content">
					<div class="blogcard_title"><p>{$card_title}</p></div>
					<div class="blogcard_description"><p>{$description}</p></div>
					<div class="blogcard_link"><span>URL</span>{$url}<i class="icon-external-link-alt"></i></div>
				</div>
			</a>
		</div>
EOS;
	return $linkcard;
}
add_shortcode("linkcard2", "show_Linkcard2");そして、見た目を整える為、CSSをコピペします。上記のfunctions.phpは2種類ありますが、CSSは共通です。
コードを表示する
.blogcard {
    position: relative;
    margin: 2em 0;
    padding: 1.4em 1.5em;
    border-radius: 8px;
    background-image: radial-gradient(currentColor 1px, transparent 1px);
    background-size: calc(10 * 1px) calc(10 * 1px);
    color: #eee;
}
.blogcard span.blogcard_thumbright {
    position: absolute;
    display: inline-block;
    top: -15px;
    left: 24px;
    padding: 6px 32px;
    line-height: 1;
    font-size: 14px;
    background: #3a3a3a;
    color: #FFF;
    font-weight: 400;
    border-radius: 50px;
}
.blogcard span.blogcard_thumbright:before {
    font-family: "Font Awesome 5 Free";
    content: "\f0a4";
    padding-right: 6px;
    font-weight: 100;
}
span.blogcard_thumbright:after {
    content: "";
    position: absolute;
    top: 100%;
    left: 50%;
    margin-left: -5px;
    border: 5px solid transparent;
    border-top: 5px solid #3a3a3a;
}
.blogcard a {
    display: flex;
    justify-content: flex-start;
    align-content: center;
    flex-wrap: wrap;
    text-decoration: none;
    box-shadow: 0 0 3px 0 rgb(0 0 0 / 12%), 0 2px 3px 0 rgb(0 0 0 / 22%);
    cursor: pointer;
    transition: 0.2s ease-in-out;
    padding: 12px 15px;
    border-radius: 2px;
    background: #ffff;
}
.blogcard a:hover {
    box-shadow: 0 15px 30px -5px rgb(0 0 0 / 15%), 0 0 5px rgb(0 0 0 / 10%);
    transform: translateY(-4px);
}
.blogcard_thumbnail {
    width: 22%;
    margin-right: 5%;
    display: inline-block;
    height: 140px;
}
.blogcard_thumbnail img {
    width: 100%;
    object-fit: cover;
    height: inherit;
}
.blogcard_content {
    width: 73%;
    display: flex;
    flex-direction: column;
    justify-content: center;
}
.blogcard_title p {
    font-size: 1.1rem;
    color: #313131;
    font-weight: 600;
    margin-bottom: 10px;
    line-height: 1.6;
}
.blogcard_description p {
    font-size: 0.8rem;
    color: #313131;
    font-weight: 400;
    margin-bottom: 5px;
}
.blogcard_link span {
    position: relative;
    left: 0;
    top: 0;
    padding: 2px 10px;
    font-size: 0.6rem;
    background: #58a9ef;
    color: #fff;
    font-weight: 600;
    vertical-align: middle;
    margin-right: 7px;
    border-radius: 3px;
}
.blogcard_link {
    font-size: 0.7rem;
    text-decoration: none;
    color: #999;
}
@media screen and (max-width: 767px) {
/* (ここにモバイル用スタイルを記述) */
.blogcard {
    padding: 35px 10px 15px;
}
.blogcard span.blogcard_thumbright {
    left: 50%;
    transform: translateX(-50%);
    width: 80%;
    text-align: center;
    padding-top: 8px;
    padding-bottom: 8px;
    font-size: 0.9rem;
}
.blogcard a {
    flex-direction: column;
    padding: 0;
    overflow: hidden;
    border-radius: 3px;
}
.blogcard_thumbnail {
    width: 100%;
    margin: 0 0 15px;
    height: auto;
}
.blogcard_thumbnail img {
    object-fit: cover;
    height: 50vw;
    width: 100%;
    object-position: center;
}
.blogcard_content {
    width: 100%;
    padding: 0 1.2rem 1.2rem;
}
}
見た目を変更したい場合は、ここのCSSをいじれば見た目や色味を変更できます。
これで設定は完了です!
以上で設定は完了です。
リンクカードのショートコード
ショートコードは、以下のように記述すれば画像・タイトル・概要文・URLがカード内に全て表示されます。
[[linkcard url="https://sample.com/"]][[linkcard2 url="https://sample.com/"]]それぞれ使うショートコードが若干違うので注意ください。
ショートコードのカスタマイズ
上記共通で、ショートコードにtitle と excerpt を追記することで、タイトルと概要文を任意の内容に変更することができます。
[[linkcard url="https://sample.com/" title="任意のタイトル名" excerpt="任意のテキスト概要文"]]もしもリンク先のタイトルや概要文を変更する場合は、上記のように記述して使いましょう。
ショートコード作成用コード
上記の手順で解説してきた、functions.phpにコピペするコードと、対応するショートコードです。
コードを表示する
/* 外部リンク対応リンクカードのショートコード */
function show_Linkcard($atts) {
  extract(shortcode_atts(array(
    'url'=>"",
    'title'=>"",
    'excerpt'=>""
  ),$atts));

  //画像サイズのwidth
  $img_width ="300";
  //画像サイズのheight
  $img_height = "300";

  //OGPを取得
  require_once 'OpenGraph.php';
  $graph = OpenGraph::fetch($url);

  //OGPタグからタイトルを取得
  $Link_title = $graph->title;
  if(!empty($title)){
    $Link_title = $title;//title=""の入力がある場合はそちらを優先
  }

  //OGPタグからdescriptionを取得
  $Link_description = wp_trim_words($graph->description, 60, '…' );//文字数は任意で変更
  if(!empty($excerpt)){
    $Link_description = $excerpt;//値を取得できない時は手動でexcerpt=""を入力
  }

  //wordpress.comのAPIを利用してスクリーンショットを取得
  $screenShot = 'https://s.wordpress.com/mshots/v1/'. urlencode(esc_url(rtrim( $url, '/' ))) .'?w='. $img_width .'&h='.$img_height.'';
  $xLink_img = '<img src="'. $screenShot .'" width="'. $img_width .'" />';

  //ファビコンGET
  $host = parse_url($url)['host'];
  $searchFavcon = 'https://www.google.com/s2/favicons?domain='.$host;
  if($searchFavcon){
    $favicon = '<img class="favicon" src="'.$searchFavcon.'">';
  }

  //HTML出力
  $linkcard .='
  <div class="blogcard ex">
  <span class="blogcard_thumbright">あわせて読みたい</span>
  <a href="'. $url .'" target="_blank" rel="noopener noreferrer">
   <div class="blogcard_thumbnail">'. $xLink_img .'</div>
   <div class="blogcard_content">
    <div class="blogcard_title"><p>'. $Link_title .'</p></div>
    <div class="blogcard_description"><p>'. $Link_description .'<p></div>
    <div class="blogcard_link"><span>URL</span>'. $url .'<i class="icon-external-link-alt"></i></div>
   </div>
   <div class="clear"></div>
  </a>
  </div>';

  return $linkcard;
}
add_shortcode("linkcard", "show_Linkcard");[[linkcard url="https://sample.com/"]]コードを表示する
//ショートコードに追加
add_shortcode("linkcard", "show_Linkcard");

function show_Linkcard2($atts){
	extract(shortcode_atts(array(
		'url' => "",
    'title'=>"",
    'excerpt'=>""
	), $atts));
	require_once('OpenGraph.php');
	$graph = OpenGraph::fetch($url);
	$card_title = $graph->title;
  if(!empty($title)){
    $card_title = $title;//title=""の入力がある場合はそちらを優先
  }
	$site_name = $graph->site_name;
	$description = wp_trim_words($graph->description, 60, '...');
  if(!empty($excerpt)){
    $description = $excerpt;//値を取得できない時は手動でexcerpt=""を入力
  }
	$image = $graph->image;
	if (!empty($image)) {
		$card_img = '<img src="' . $image . '" width="300" alt="' . $card_title . '">';
	} else {
		$card_img = '<img src="' . get_template_directory_uri() . '/library/images/default_small.jpg' . '" width="300" alt="' . $card_title . '">'; //画像がない時
	}
	$linkcard = <<<EOS
  <div class="blogcard ex">
  <span class="blogcard_thumbright">外部リンク</span>
  <a href="{$url}" target="_blank" rel="noopener noreferrer">
				<div class="blogcard_thumbnail">{$card_img}</div>
				<div class="blogcard_content">
					<div class="blogcard_title"><p>{$card_title}</p></div>
					<div class="blogcard_description"><p>{$description}</p></div>
					<div class="blogcard_link"><span>URL</span>{$url}<i class="icon-external-link-alt"></i></div>
				</div>
			</a>
		</div>
EOS;
	return $linkcard;
}
add_shortcode("linkcard2", "show_Linkcard2");[[linkcard2 url="https://sample.com/"]]ざっくりとしたコードの解説
ざっくりとしたコードの解説です。
functions.php:抜粋文字数
抜粋する概要文の文字数は、両方とも以下のように60文字までにしています。ここの数値を変更することで、表示する文字数を変更することができます。
  //OGPタグからdescriptionを取得(抜粋文として利用)
  $Link_description = wp_trim_words($graph->description, 60, '…' );//文字数は任意で変更
  if(!empty($excerpt)){
$Link_description = $excerpt;//値を取得できない時は手動でexcerpt=""を入力$description = wp_trim_words($graph->description, 60, '...');
if(!empty($excerpt)){
$description = $excerpt;//値を取得できない時は手動でexcerpt=""を入力
}functions.php:外部リンクにrel=”noopener noreferrer”
リンクの a タグは、外部リンクなのでtarget="_blank" でrel属性にnoopener noreferrer をつけるようにしています。
効果の「パフォーマンス低下回避」「脆弱性の回避」が理由ですが、リンクの挙動を変更したい場合は上記の箇所を変更するなりして記述してください。
関連記事 rel属性noopener・noreferrer・noopener・sponsoredの効果と役割
さいごに
両方とも外部リンクをカードにできる便利なスニペットですが、動作が結構重いです。
その為、使い所が非常に難しくそれなりのサーバースペックが必要ですが、外部のリンクカードを簡単に作れるので是非使ってみてください。
参考サイト
参考Cocoon 内部ブログカード表示でのクエリリセット対策せせりぶ
